Event tracks
Odoo Events provides the ability to create, schedule, and manage talks, lectures, demonstrations, presentations, etc., which known as Tracks in Odoo.
The Odoo Events application also has an option to allow event attendees to propose talks (tracks) for an event, which can then be approved (or disapproved).
Configuration
First, there are some settings that need to be enabled, in order to get the most out of event tracks.
To do that, navigate to , and tick the checkbox beside the Schedule & Tracks setting. Doing so provides the ability to manage and publish an event schedule with various tracks.
Also, when that setting checkbox is ticked, two additional setting options appear beneath it: Live Broadcast and Event Gamification.

The Live Broadcast option provides the ability to air tracks online through a YouTube integration.
The Event Gamification options provides the ability to share a quiz with track attendees once the track is over, in order to test how much they learned.
Note
With the Event Gamification setting enabled, an Add Quiz button appears on track forms, providing the ability to quickly create a quiz specific to the topic related to that particular track.
Once all desired settings have been enabled, be sure to click the Save button in the upper-left corner of the Settings page.
Event Tracks page
To access, modify, and/or create tracks for an event, first navigate to a preconfigured event, or create a new one from the Events application.
To do that, navigate to , and either select a pre-existing event from the Events dashboard, or create a new one by clicking New.
Once on the desired event form, click into the Tracks smart button at the top of the form.
Tip
If the Tracks smart button is not readily available, click the More drop-down menu to reveal hidden smart buttons. Then, click Tracks from the resulting drop-down menu.
Clicking the Tracks smart button reveals the Event Tracks page for that particular event, which presents all the tracks (both scheduled and proposed) for the event, if there are any.

The tracks are presented in a default (Kanban) view, but there is also the option to view these tracks in a (List), (Gantt) chart, (Calendar), (Graph), or (Activity) view. All of which are accessible in the upper-right corner of the Tracks page.
In the default (Kanban) view, the tracks are categorized into different stages. The default stages are: Proposal, Confirmed, Announced, Published, Refused (collapsed stage), and Cancelled (collapsed stage). All of which can be edited, if needed.
Tip
To edit a stage, hover over the stage name, click the (Settings) icon, and select Edit from the resulting drop-down menu.
Clicking into a track from the Event Tracks page reveals the track form for that particular track.
Create event track
From the Event Tracks page, click New in the upper-left corner to reveal a blank event track form to create an event track.
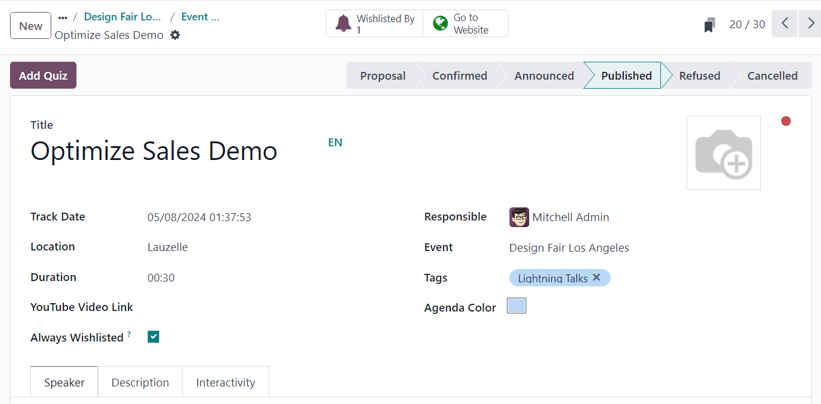
Start by giving this track a Title. This field is required by Odoo.
Then, if desired, add an accompanying image to the track via the (pencil) icon that appears when the cursor hovers over the (camera) icon in the upper-right corner of the form. When clicked, proceed to upload the desired image for the track. This image appears on the front-end of the event website, on this specific tracks webpage.
Next, enter a Track Date and time for the track, and designate a Location where the talk is planning to be held.
Tip
To access a complete list of locations for event tracks, which can be modified (and added to) at any time, navigate to .
Then, add a Duration to the track (in minutes).
If the Live Broadcast setting has been enabled in the Events app settings, the option to add a corresponding link in the YouTube Video Link field is available.
If the Always Wishlisted checkbox is ticked, the talk is automatically set as a favorite for each registered event attendee.
Assign someone to be in charge of managing this track in the Responsible field. By default, the person who initially created the track is assigned.
Then, ensure the track is applied to the correct event in the Event field. By default, this field is auto-populated with the event related to the Event Tracks page the track was originally created from.
Next, choose to add existing tags, or create new ones, to further organize the track. These tags, and their corresponding tag categories are utilized on the event specific website - mainly on the Talks web page on the event website, via the drop-down filter menus.
Beneath that general information section, there are three tabs: Speaker, Description, and Interactivity.
Speaker tab
The Speaker tab on an event track form is filled with various fields related to the specific speaker who is planning to conduct/host the track.

Contact Details section
In the Contact Details section, proceed to use the Contact drop-down field to select an existing contact from the database as the main point of contact for the talk.
If this contact is not yet in the database, type in the name of the contact, and click Create to create and edit the contact form later, or click Create and edit… to be taken to that new contact’s contact form, where the rest of their pertinent information can be entered.
The Contact Email and Contact Phone fields are greyed-out and populated with the information found on that chosen contact’s contact form. These fields are not modifiable once the Contact field is selected.
Speaker Bio section
In the Speaker Bio section, proceed to enter information related to the specific speaker scheduled to conduct/host the track. This section may auto-populate based on the Contact selected in the Contact Details section. If not, enter information in the necessary fields.
Note
This information appears on the front-end of the event website, on the specific track webpage, providing more information about the speaker to the track attendees.
Start by entering a Name, Email, and Phone number for the speaker.
Next, if desired, add an image to appear alongside the speaker biogrpahy on the event website, via the (pencil) icon that appears when the cursor hovers over the (camera) icon. When clicked, proceed to upload the desired image for the speaker.
Then, enter a Job Position for the designated speaker, followed by the Company Name associated with the speaker.
In the Biography field, proceed to enter in a custom biography with any speaker-related information.
Description tab
The Description tab of an event track form is a blank text field, in which a description of the track can be entered. The information entered here appears on the specific track page on the event website.
Interactivity tab
The Interactivity tab on an event track form features a single option at first: Magic Button.

When the checkbox beside Magic Button is ticked, Odoo displays a call to action button to attendees on the track sidebar, while the track is taking place.
With that checkbox ticked, three more options appear, all of which are related to the Magic Button:
Button Title: enter a title to appear on the button for attendees.
Button Target URL: enter a URL that leads attendees, who click the button, to a specific page.
Show Button: enter a number in the field, and the button will appear that number of minutes after Track start.
Note
The magic button only appears if there is more than one published track.
Add Quiz button
The Add Quiz button only appears on event track forms if the Event Gamification setting is enabled in the Odoo Events settings.
To add a quiz to the event track, click the Add Quiz button. Doing so reveals a separate page where an event track quiz can be created and configured.

Start by entering a title for the quiz in the blank field at the top of the page. Then, if participants should be allowed to try the quiz multiple times, tick the checkbox beside Allow multiple tries.
The Event and Event Track fields are non-modifiable, and show the corresponding event and track this quiz is associated with.
To add questions to the quiz, click Add a line beneath the Question column. Doing so reveals a Create Questions pop-up window.
Note
All track quiz questions are multiple choice.
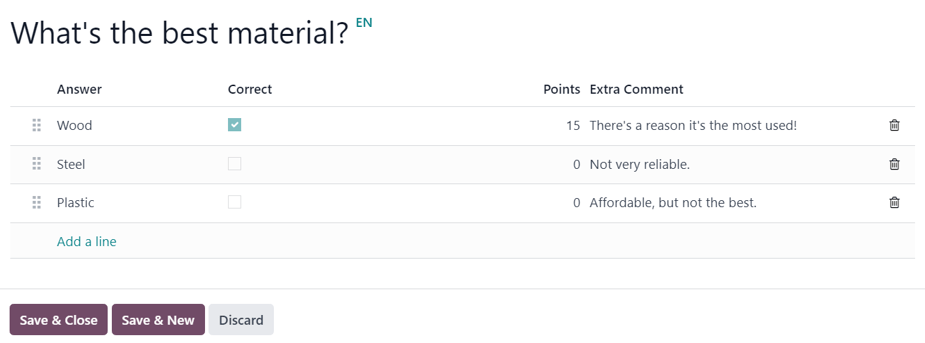
From the pop-up window, enter the question in the blank field at the top. Then, click Add a line to add answer options. Upon clicking Add a line, a new line appears, in which an answer option can be entered.
Once an answer option has been entered, proceed to designate whether it is the Correct response, by ticking the checkbox in the Correct column.
Then, there is the option to add a point value in the Points column.
And, if there are any additional comments that should accompany an answer option, type them into the Extra Comment field.
Note
The Correct, Points, and Extra Comment fields are all optional.
Repeat this process for all the answer options.
To remove an answer option, click the (trash can) icon on the far-right.
Once all desired answer options (and their configurations) are complete, click Save & Close to save the question, close the pop-up window, and return to the track quiz form. Or, click Save & New to save this question, and instantly start creating another question on a new Create Questions pop-up form.
To remove any question from the quiz, click the (trash can) icon on the far-right of the question line.
Publish event track
Once all the desired configurations are complete on an event track form, click the desired stage it should be in from the status bar in the upper-right corner (e.g. Confirmed, Announced, etc.).
Note
The stage of a track can also be changed from the Event Tracks page, where the desired track card can be dragged-and-dropped into the appropriate Kanban stage.
If an event track has not been published yet, and it is moved to the Published stage, Odoo automatically publishes the track on the event website.
An event track can also be published by opening the desired event track form, and clicking the Go to Website smart button. Then, in order for the track page to be viewable (and accessible) for event attendees, toggle the Unpublished switch at the top of the page to Published; thus turning it from red to green, and making it accessible for attendees.
