Global filters
Create dynamic views of inserted data, by mapping data source fields to global filters in the Odoo Spreadsheets app.
Note
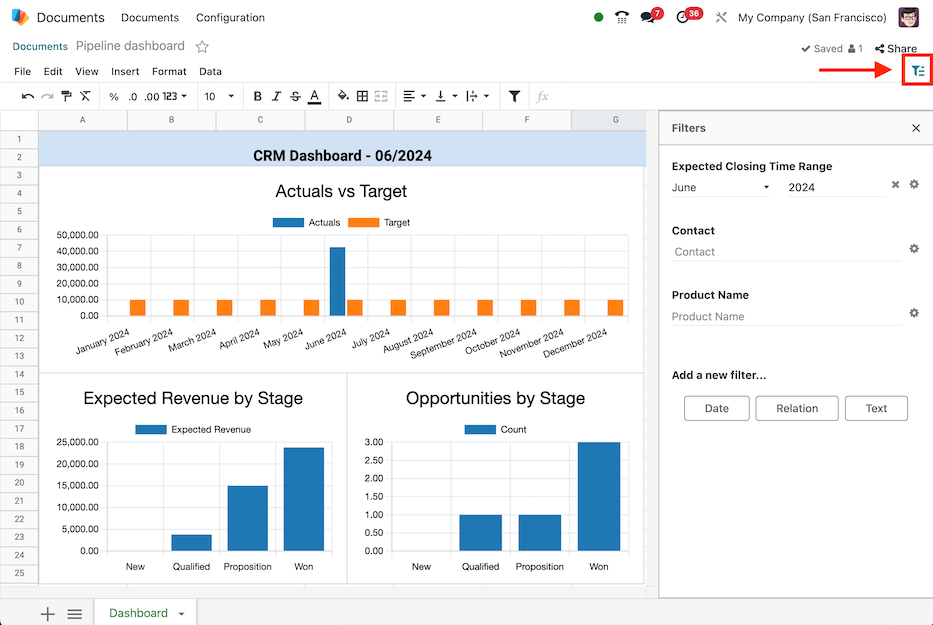
The global filters are represented by the (global filter) icon, and enable data that was inserted via a pivot table, list, or chart to be filtered. Global filters differ from the sort and filter feature for cell ranges represented by the (filter) icon.
Add filters
Navigate to the and click on the desired spreadsheet, then open the (global filter) filter menu.
Create a new filter by selecting one of the buttons under the Add a new filter… section:
Date: filter dates by matching data source date fields to a time range (e.g., Month / Quarter, Relative Period, or From / To).
Relation: filter records by matching data source fields to fields in a related model (e.g., Lead/Opportunity, Sales Order, or Event Registration).
Text: filter text by matching data source text fields to a string of text (e.g., Restrict values to a range and/or provide a Default value).
Note
Only filters that are able to be applied to the fields in the data source are shown.
Date
The Date global filter enables the filtering of data sources by a specific time range, to automatically filter on the current period, or to offset the time range relative to the period.
With the (global filter) menu open, select the Date button to create a new date filter. The Filter properties menu displays the following fields for configuration below.
First, enter a name for the new date filter in the Label field.
Then, select one of the three period options in the Time range field:
Month / Quarter: enables a drop-down menu of specific months and quarters of a year (i.e., Q1, Q2, January, etc.).
Relative Period: enables a drop-down menu of specific moving time frames (i.e., Year to Date, Last 7 Days, Last 30 Days, etc.).
From / To: enables Date from… and Date to… date selection fields to define a specific time range (e.g.,
06/05/2024to06/27/2024).
Optionally, set a Default value for the Time range.
Note
The Default value field only appears for Month / Quarter or Relative Period ranges.
If the Month / Quarter range is selected, tick the Automatically filter on the current period checkbox to define the default period of either Month, Quarter, or Year.
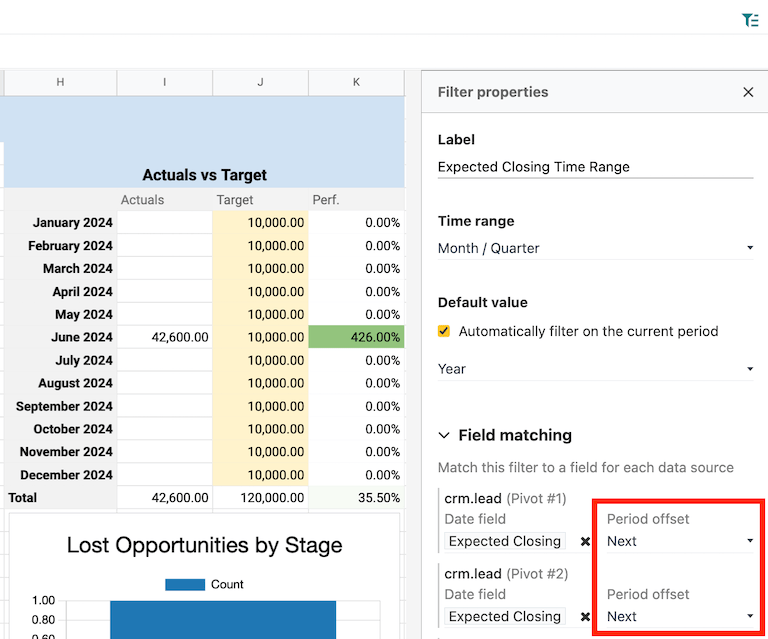
Next, configure the Field matching for each data source. To do so, expand the section by clicking on the Field matching heading, to reveal a list of the data sources in the spreadsheet where each data source has two fields for matching:
Date field: select a date field from the data source model to apply the time range to.
Period offset: (optionally) select an offset that shifts the time range by a relative period.
The options available are: Previous, Before Previous, Next, After Next.
Lastly, once all the information is entered on the form, click the Save button. If any of the data source fields do not match the data type of date (or datetime), an error is shown stating Some required fields are not valid.
Example
Consider a Period offset of Next when using the Month / Quarter range to apply the filter to the next period relative to the set time range.
With this configuration, selecting January 2024 as the date, filters data as February
2024; where the selected month is offset to the next month.
Relation
The Relation global filter enables the filtering of records in data sources by selecting a field from a related model.
With the (global filter) menu open, select the Relation button to create a new relation filter. The Filter properties menu displays the following fields for configuration.
First, enter a name for the new relation filter in the Label field.
Then, select or search for a model from the Related model field.
Once a model is selected, the Default value and Field matching fields appear.
Optionally, set a Default value for the Related model. The available options are records of the model.
Next, configure the Field matching for each data source. To do so, expand the section by clicking on the Field matching heading, to reveal a list of the data sources in the spreadsheet where each data source has a field for matching.
Select a field from the data source model from which to apply the relation filter.
Lastly, once all the information is entered on the form, click the Save button. If any of the data source fields do not match the data type of the related model, an error is shown stating Some required fields are not valid.
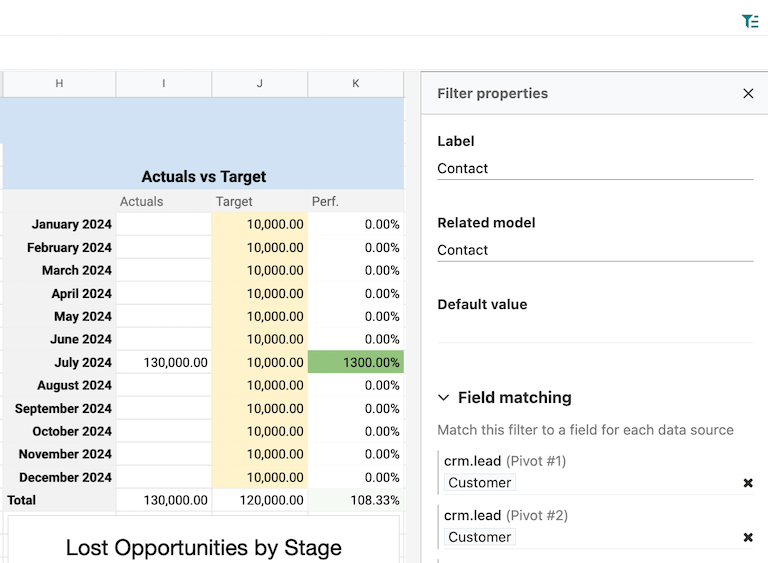
Example
Consider a Relation filter with the Related model set as Contact. The
Field matching CRM lead (crm.lead) pivot data sources are set to
Customer.
With this configuration, selecting a customer record filters the pivot table to only leads that are related to the selected customer record.
Text
The Text global filter enables the filtering of text by matching data source text fields to a string of text or to a range of predefined values.
With the (global filter) menu open, select the Text button to create a new text filter. The Filter properties menu displays the following fields for configuration.
First, enter a name for the new text filter in the Label field.
Then, choose whether or not to Restrict values to a range by ticking the checkbox. Doing so, reveals a field to input a range within the spreadsheet. Either type in or select the range.
Next, configure the Field matching for each data source. To do so, expand the section by clicking on the Field matching heading, to reveal a list of the data sources in the spreadsheet where each data source has a field for matching.
Select a field from the data source model from which to apply the text filter.
Lastly, once all the information is entered on the form, click the Save button. If any of the data source fields do not match the data type of the related model, an error is shown stating Some required fields are not valid.
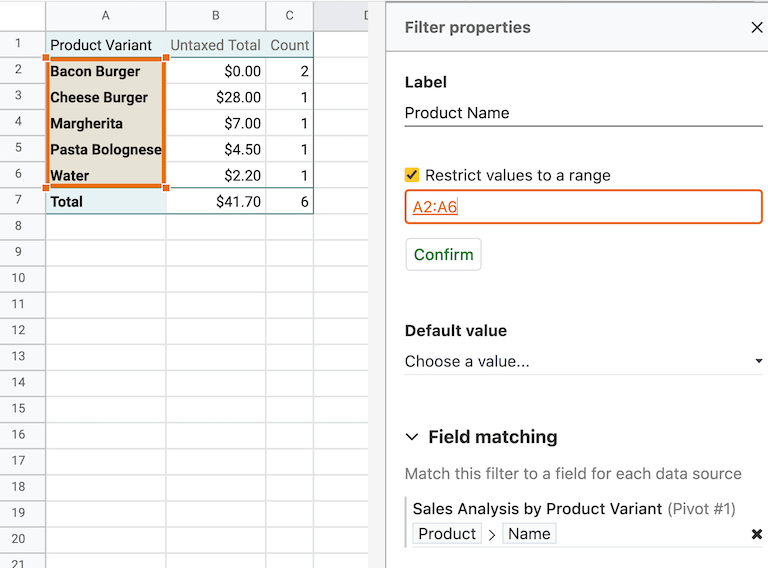
Example
Consider a text filter with the range A2:A6 added to the Restrict values to a range
field. The spreadsheet has five different product names listed as values in the cells of column
A, rows 2 though 6.
With the above configuration, a pivot table of products can be filtered by product name by selecting one of the 5 predefined values available in the text filter.
Furthermore, if the values in the range A2:A6 are added dynamically– the text filter becomes
dynamic as well.
Manage filters
Open the (global filter) filter menu by navigating to the and clicking on the desired spreadsheet.
Existing global filters appear under the Filters section. Filters can be used individually, or at the same time.
Tip
The order of existing filters can be changed by hovering over a filter and using the (drag handle) icon to change the position.
To reset a filter with set values back to default, click on the (clear) icon next to the value in the filter.
To edit an existing filter, select the (gear) icon to open the filter’s Filter properties menu. From here, edits can be made or the filter can be deleted by clicking the Remove button.