Marketing attribution reports
Use the Odoo CRM app to compile a marketing attribution report, which analyzes the source of leads, and groups them in such a way as to calculate marketing’s overall impact on lead generation, attribution, won rate, and more.
Leads Analysis dashboard
Begin by navigating to the Leads Analysis dashboard by going to .
Tip
Reports can also be run on the dashboard, which is only accessible if the Leads feature has been activated on the Settings page.
If the Leads feature has not been activated, the dashboard can also be used to run reports.
Both dashboards contain the necessary Filters and Group By criteria to run an attribution report.

The (graph) view is shown, by default, with Active or Inactive and Created on: [current year] filters active in the Search… bar. The graph visualization displays the number of leads generated, by month and by sales team, with each sales team attributed to its own color per month shown.
Switch the view to the (list) option, by clicking the respective icon located at the top-right of the dashboard. This allows leads to easily be displayed in the grouping set by the Group By parameters.

Add UTM parameters
Urchin Tracking Modules (UTMs) are snippets of text embedded in URLs that are used to track visitor data. This includes parameters relating to how a visitor reached the link, such as the type of website visited, and/or marketing campaign the visit came from.
Odoo can use these UTMs as parameters in the marketing attribution report to track the metrics and performance of marketing campaigns.
Create UTMs
The link tracker in Odoo can be used to create and configure UTMs.
UTMs can also be automatically generated by the Email Marketing and Marketing Automation apps.
The UTM parameters used in a marketing attribution report are Medium, Source, and Campaign, in descending order of coverage.
Medium is the UTM with the widest coverage, and is used to identify the medium used to access the link. This can include mediums such as social media, email, or cost per click (CPC).
Source is more narrow, and is used to identify the source of traffic. For example, the name of a website, search engine used, or a specific social media platform.
Campaign is the most narrow, and can track specific marketing campaigns by name. This can include a contest or product name, type of sale, etc.
Create reports
To start creating a report, click the (down arrow) to the right of the Search… bar to see the list of filtering and grouping parameters.
Filters, located in the left column of the search options, can be used to keep only the results that fit the filter. For example, selecting the Won filter only shows leads that have been won in the attribution report.
Group By, found in the middle column, is used to organize the results into groups, and can be used with or without filters.

Tip
Setting multiple Group By options creates nested groups, according to which option is selected first. For example, selecting Medium, followed by Source, and then Campaign, in Group By column, sorts all results first by medium, then by the specific sources in each medium, followed by the campaigns in each source.
This can be verified by looking at the direction, and order, of the selections in the group tile that appears in the Search… bar.

Example
For a useful first report:
#. From the Filters column, select the Active filter to view only leads that are still marked as active. #. From the Group By column, select (in this specific order) Source, followed by the City or Country, depending on which grouping is more relevant.
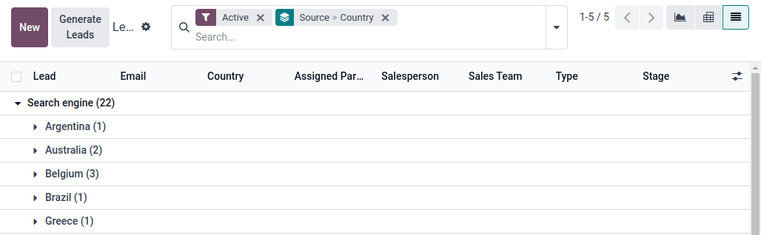
This report contains all active leads, grouped first by the source of the lead, then by the city or country each lead is from. This is useful to see the density of active opportunities sorted by location.
With this data, marketing campaigns, such as conferences or billboards, can be targeted to the locations generating the largest amount of potential revenue. Similarly, more attention can be put toward increasing outreach in locations where existing marketing campaigns are less effective.
Export reports
To set the measures of the report, begin by navigating to the (pivot view) on the Leads Analysis dashboard.
Click the Measures button to view the available measures of the report. Select the desired measures from the drop-down menu (multiple measures can be selected), and verify the measures, filters, and groups are all displayed correctly in the pivot table. This ensures the data is ready for export.
To quickly export the data in a list, as a .xlsx file, navigate to the (list view). Click on the Actions (gear) icon, located to the right of Lead Analysis in the top-left of the page, and click Export All. The report downloads automatically as a .xlsx file.
For more export options, the report can be exported to the Odoo Documents app. From the (list view) of Leads Analysis page, begin by clicking the Actions (gear) icon again. Now, navigate to Spreadsheet, and click Insert list in spreadsheet. A pop-up window titled, Select a spreadsheet to insert your list. appears.
The report can be renamed using the Name of the list field, if desired. The number of items on the
report can be set with the field labeled: Insert the first _ records of the list. Next, select
either a new Blank spreadsheet, or export into an existing spreadsheet. Finally, click
the Confirm button.

To export the report as a .xlsx file, for use in an external spreadsheets program, click the Actions (gear) icon, and select the Export All option. If prompted, choose a file location, name the file, then click Save.