New appraisals
To create a new appraisal for an employee, first navigate to the main Appraisals dashboard by opening the app. The Appraisals dashboard is the default view.
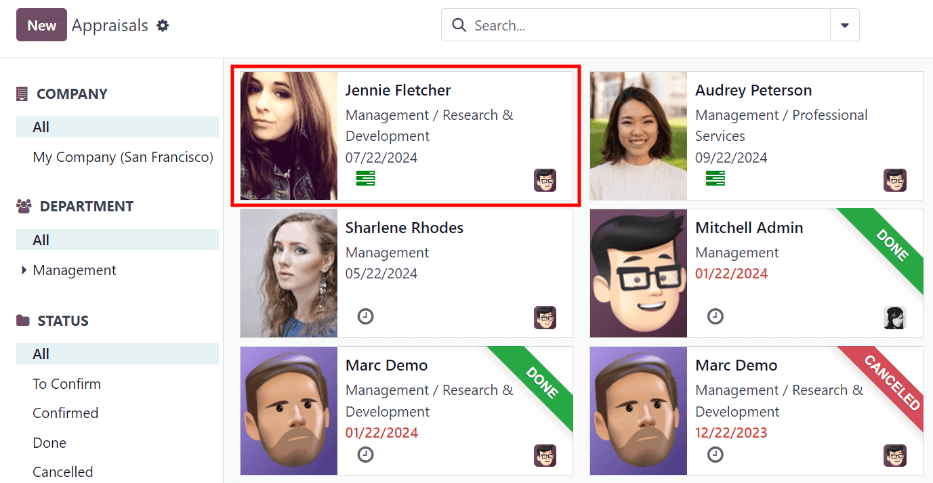
Appraisals dashboard
All appraisals are displayed on the dashboard in a default Kanban view, with a list of groupings on the left side of the dashboard, including COMPANY, DEPARTMENT, and STATUS.
Click any grouping option to view appraisals for only the chosen selection.
Note
Only groupings with multiple selections appear in the list. For example, if a database only has one company, the COMPANY grouping does not appear, since there is no other company to select.
Each appraisal card displays the following information:
Name: the employee’s name.
Department: the department the employee is associated with.
Company: the company the employee works for. This only appears in a multi-company database.
Date: the date the appraisal was requested, or is scheduled for in the future.
Activities: any activities that are scheduled for the appraisal, such as Meetings or Phone Calls.
Manager: the employee’s manager, indicated by the profile icon in the bottom-right corner of an appraisal card.
Status banner: the status of the appraisal. A banner appears if an appraisal is marked as either Canceled or Done. If no banner is present, that means the appraisal has not happened, or has not been scheduled yet.
To view the details of any appraisal, click on the card to open the appraisal form.
Create an appraisal
To create a new appraisal, click the New button in the upper-left corner of the Appraisals dashboard. Doing so reveals a blank appraisal form. After entering a name in the first blank field, proceed to enter the following information on the form:
Manager: select the employee’s manager from the drop-down menu. The manager is responsible for completing the Manager’s Feedback section of the appraisal. This field auto-populates after the employee is selected, if they have a manager set on their employee profile.
Appraisal Date: the current date is automatically entered in this field. This field is automatically updated once the appraisal is completed or cancelled, with the corresponding date of completion or cancellation.
Department: select the employee’s department from the drop-down menu. This field auto-populates after the employee is selected, if they have a department set on their employee profile.
Company: select the employee’s company from the drop-down menu. This field auto-populates after the employee is selected, if they have a company set on their employee profile.
Note
The only required fields for the appraisal form are the employee’s name, the Manager, and the Company.
Once the form is complete, click the Confirm button to confirm the appraisal request.
Once confirmed, the employee receives an email stating that an appraisal was requested, and is then prompted to schedule an appraisal date.
The status changes to Confirmed, and the Employee’s Feedback section of the Appraisal tab is grayed out. The information in that section only appears after the self-assessment is published by the employee. The Final Rating field also appears once the appraisal request is confirmed.
If there are any existing appraisals for the employee, an Appraisal smart button appears at the top of the page, listing the total number of appraisals there are for the employee.
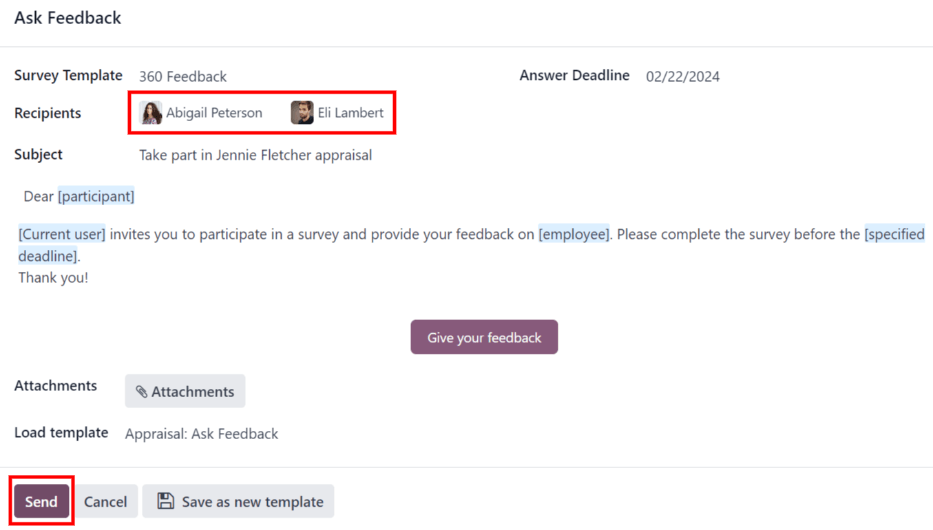
Ask for feedback
As part of the appraisal process, the manager can request feedback on an employee from anyone in the company. Feedback is usually requested from co-workers and other people who interact with, or work with, the employee. This is to get a more well-rounded view of the employee, and aid in the manager’s overall assessment.
To request feedback, the appraisal must be confirmed. Once confirmed, an Ask Feedback button appears at the top of the form.
When the Ask Feedback button is clicked, an Ask Feedback email pop-up form appears, using the Appraisal: Ask Feedback email template, which sends the 360 Feedback survey.
Enter the employees being asked to complete the survey in the Recipients field. Multiple employees may be selected.
The email template has dynamic placeholders to personalize the message. Add any additional text to the email, if desired.
If required, an Answer Deadline can be added, as well.
If any attachments are needed, click the Attachments button, and a file explorer window appears. Navigate to the file(s), select them, then click Open.
When the email is ready to send, click Send.
Appraisal form
Once an appraisal is confirmed, the next steps require the employee to fill out the self-assessment, after which the manager completes their assessment.
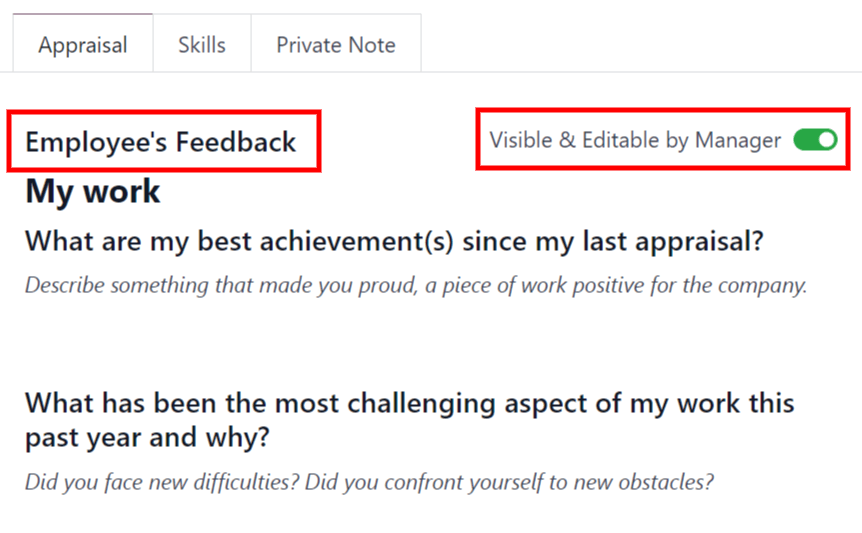
Employee’s feedback
To complete their portion of feedback, employees should navigate to the main dashboard, where the only entries visible are appraisals for the employee, themselves, and/or anyone they manage and have to provide manager feedback for.
Click on the appraisal to open the appraisal form. Enter responses in the Employee’s Feedback section, under the Appraisal tab.
When completed, click the Not Visible to Manager toggle (the default setting once an appraisal is confirmed). When clicked, the toggle changes to Visible to Manager.
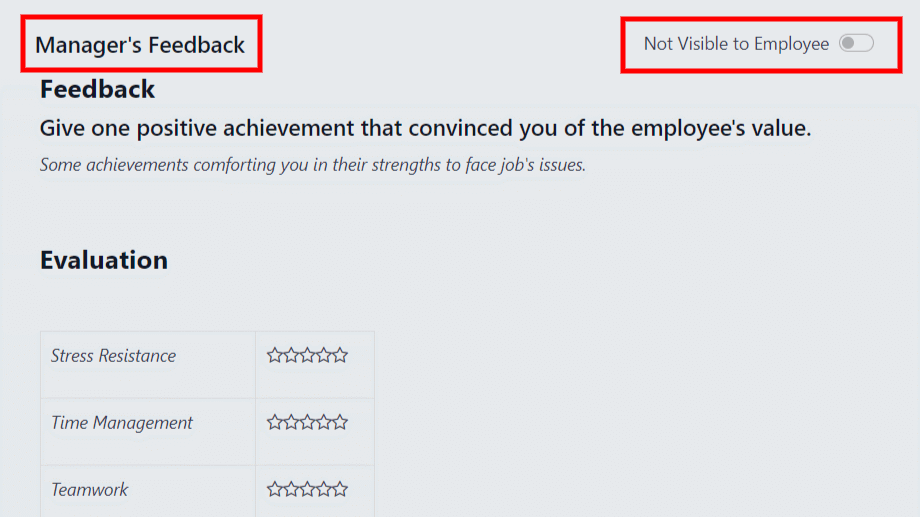
Manager’s feedback
After the employee has completed the Employee’s Feedback section, under the Appraisal tab, it is time for the manager to fill out the Manager’s Feedback section.
The manager enters their responses in the fields in the same manner as the employee.
When the feedback section is completed, click the Not Visible to Employee toggle (the default setting once an appraisal is confirmed). When clicked, the toggle changes to Visible to Employee.
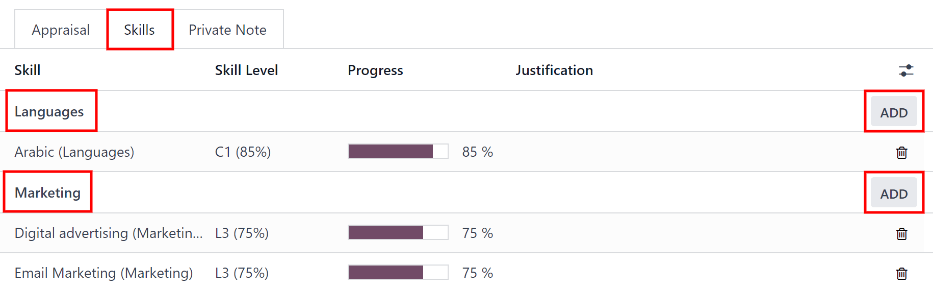
Skills tab
Part of an appraisal is evaluating an employee’s skills, and tracking their progress over time. The Skills tab of the appraisal form auto-populates with the skills from the employee form, once an appraisal is confirmed.
Each skill is grouped with like skills, and the Skill Level, Progress, and Justification are displayed for each skill.
Update any skills, or add any new skills to the Skills tab.
If a skill level has increased, a reason for the improved rating can be entered into the
Justification field, such as took a fluency language test or received Javascript
certification.
See also
Refer to the Create a new employee document for detailed instructions on adding or updating a skill.
After an appraisal is completed, and the skills have been updated, the next time an appraisal is confirmed, the updated skills populate the Skills tab.
Note
The Skills tab can be modified after the employee and their manager have met and discussed the employee’s appraisal.
This is a common situation as the manager may not have all the necessary information to properly assess and update the employee’s skills before meeting.
Private Note tab
If managers want to leave notes that are only visible to other managers, they can be entered in the Private Note tab. This can be done before or after meeting with the employee to discuss the appraisal.
The employee being evaluated does not have access to this tab, and the tab does not appear on their appraisal.
Schedule a meeting
Once both portions of an appraisal are completed (the employee and manager feedback sections), it is time for the employee and manager to meet and discuss the appraisal.
A meeting can be scheduled in one of two ways: either from the Appraisals application dashboard, or from an individual appraisal card.
To schedule an appraisal from the dashboard of the Appraisals application, first navigate to .
Click the (clock) icon, beneath the appraisal date on the desired appraisal card, and a pop-up window appears. Then, click Schedule an activity to create an activity from a Schedule Activity pop-up form that appears.
Select Meeting for the Activity Type from the drop-down menu. Doing so causes the form to change, so only the Activity Type and Summary fields appear.
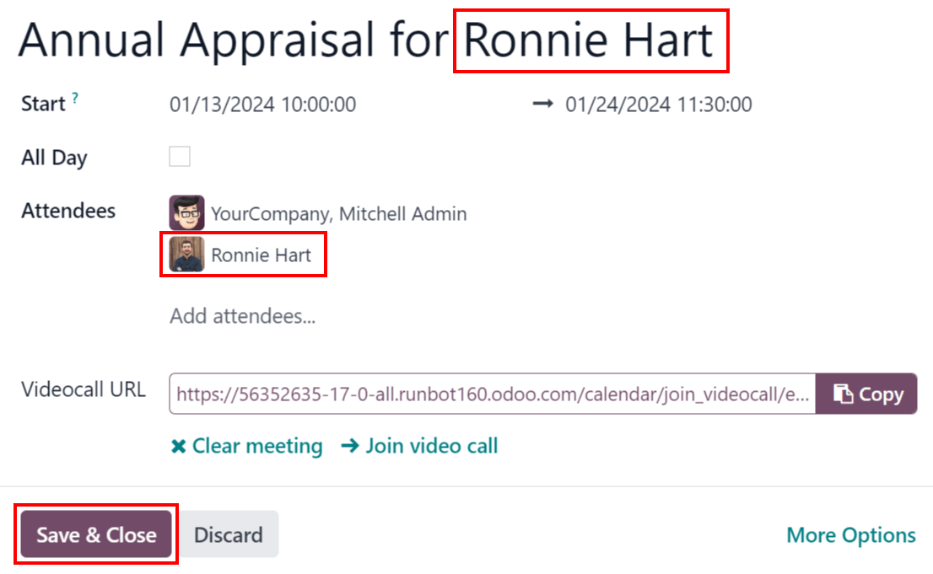
Enter a brief description in the Summary field of the Schedule Activity
pop-up form, such as Annual Appraisal for (Employee).
Next, click the Open Calendar button. From the calendar page that appears, navigate to, and double-click on, the desired date and time for the meeting.
Doing so opens a New Event pop-up form. From this pop-up form, make any desired modifications, such as designating a Start time, or modifying the default Title to the meeting.
Add the appraisee in the Attendees section, and include anyone else who should also be in the meeting, if necessary.
To make the meeting a video call, instead of an in-person meeting, click Odoo meeting, and a Videocall URL link appears in the field.
Once all the desired changes are complete, click Save & Close.
The meeting now appears on the calendar, and the invited parties are informed, via email.
The other way to schedule a meeting is from the individual appraisal form. To do this, navigate to the dashboard, then click on an appraisal card.
Next, click on the Meeting smart button, and the calendar loads. Follow the same directions above to create the meeting.
For more detailed information on how to schedule activities, refer to the activities documentation.
Note
If no meetings are scheduled, the Meeting smart button reads No Meeting.
Complete an appraisal
After the appraisal is complete, and both the manager and employee have met to discuss the appraisal, the appraisal can be marked as Done. When completed, click the Mark as Done button on the appraisal form, located in the top-left corner.
Once the appraisal is marked as Done, the Mark as Done button disappears, and a Reopen button appears.
Tip
Modifications are not possible once the appraisal is marked as done.
To make any changes to an appraisal that is marked as Done, click the Reopen button.
Then, click the Confirm button that appears, and make any modifications needed. Once all modifications are complete, click the the Mark as Done button again.