Schedule interviews
Schedule in-person, virtual, and phone interviews with Odoo through the Recruitment app.
An interview can be scheduled in one of two ways: either by the recruitment team, or by the applicant.
Recruitment team scheduled interviews
When an applicant reaches the interview stage, the recruitment team should schedule the interview, by first coordinating a suitable date and time with the applicant and interviewers.
To schedule the interview, navigate to the applicant’s card, by first going to the , and clicking the relevant job card. This opens the Applications page for that job position. Then, click the desired applicant’s card to view their detailed applicant form.
To schedule an phone, virtual, or in-person interview, click the No Meeting smart button at the top of the applicant’s record.
Note
The Meetings smart button displays No Meeting if no meetings are currently scheduled. For applicants who are new to the First Interview stage, this is the default.
If there is one meeting already scheduled, the smart button displays 1 Meeting, with the date of the upcoming meeting beneath it. If more than one meeting is scheduled, the button displays Next Meeting, with the date of the first upcoming meeting beneath it.
Clicking the Meetings smart button loads a calendar, showing the scheduled meetings and events for the currently signed-in user, as well as the employees who are listed under the Attendees section, located to the right of the calendar.
To change the currently loaded meetings and events being displayed, uncheck an attendee whose calendar events are to be hidden. Only the checked attendees are visible on the calendar.
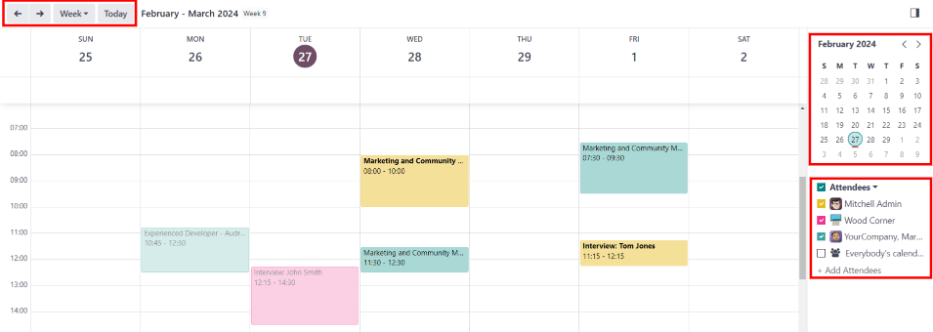
To add a meeting to the calendar when in the Day or Week view, click on the start time of the meeting and drag down to the end time. Doing so selects the date, time, and the length of the meeting.
A meeting can also be added in this view by clicking on the desired day and time slot.
Both methods cause a New Event pop-up window to appear.
New event pop-up window
Clicking a grid, corresponding with the time and date, opens the New Event pop-up window to schedule a meeting.
Enter the information on the form. The only required fields to enter are a title for the meeting, along with the Start (and end date/time) fields.
Once the card details are entered, click Save & Close to save the changes and create the interview.
After entering in a required name for the meeting, the fields available to modify on the New Event card are as follows:
Meeting Title: enter the subject for the meeting. This should clearly indicate the purpose of the meeting. The default subject is the Subject/Application Name on the applicant’s card.
Start: start and end date and times for the meeting. Clicking either of these fields opens a calendar pop-up window. Click Apply to close the window.
All Day: tick the box to schedule an all-day interview. If this box is ticked, the Start field changes to Start Date.
Attendees: select the people who should attend the meeting. The default employee listed is the person who created the meeting. Add as many other people as desired.
Videocall URL: if the meeting is virtual, or if there is a virtual option available, click Odoo meeting, and a URL is automatically created for the meeting, which populates the field.
Description: enter a brief description in this field. There is an option to enter formatted text, such as numbered lists, headings, tables, links, photos, and more. Use the powerbox feature, by typing a
/to reveal a list of options.Scroll through the options and click on the desired item. The item appears in the field, and can be modified. Each command presents a different pop-up window. Follow the instructions for each command to complete the entry.
More options
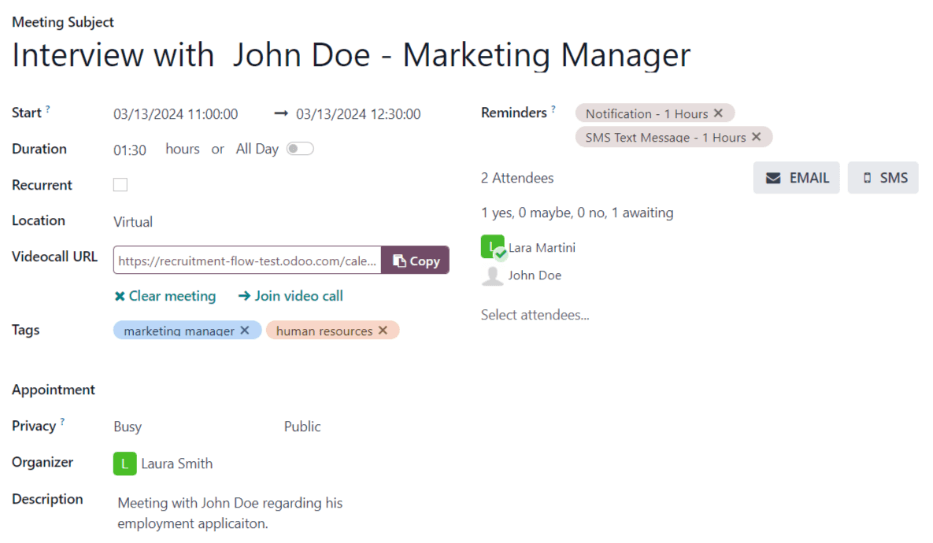
To add additional information to the meeting, click the More Options button in the lower-right corner of the New Event pop-up window. Enter any of the following additional fields:
Duration: this field auto populates based on the Start (and end) date and time. If the meeting time is adjusted, this field automatically adjusts to the correct duration length. The default length of a meeting is one hour.
Recurrent: if the meeting should repeat at a selected interval (not typical for a first interview), tick the checkbox next to Recurrent. Several additional fields appear when this is enabled:
Timezone: using the drop-down menu, select the Timezone for the recurrent meetings.
Repeat: choose Daily, Weekly, Monthly, Yearly, or Custom recurring meetings. If Custom is selected, a Repeat Every field appears beneath it, along with another time frequency parameter (Days, Weeks, Months, or Years). Enter a number in the blank field, then select the time period using the drop-down menu.
Repeat on: enabled when the Weekly option is selected in the Repeat field. Choose the day the weekly meeting falls on.
Day of Month: configure the two drop-down menu options to select a specific day of the month, irrespective of the date (e.g. the first Tuesday of every month). To set a specific calendar date, choose Date of Month and enter the calendar date in the field (e.g.
15to set the meeting to occur on the fifteenth of every month).Until: using the drop-down menu, select when the meetings stop repeating. The available options are Number of repetitions, End date, and Forever. If Number of repetitions is selected, enter the number of total meetings to occur in the blank field to the right. If End date is selected, specify the date using the calendar pop-up window, or type in a date in a XX/XX/XXXX format. Forever schedules meetings indefinitely.
Location: enter the location for the meeting.
Tags: select any tags for the meeting using the drop-down menu, or add a new tag by typing in the tag and clicking Create “tag”. There is no limit to the number of tags that can be used.
Appointment: if an appointment is associated with this meeting, select it from the drop-down menu, or create a new appointment by typing in the appointment name, then clicking Create & Edit… from the resulting drop-down men. A Create Appointment form loads. Enter the information on the form, then click Save & Close.
Privacy: select if the organizer appears either Available or Busy for the duration of the meeting. Next, select the visibility of this meeting, using the drop-down menu to the right of the first selection. Options are Public, Private, and Only internal users. Public allows for everyone to see the meeting, Private allows only the attendees listed on the meeting to see the meeting, and Only internal users allows anyone logged into the company database to see the meeting.
Organizer: the employee who created the meeting is populated in this field. Use the drop-down menu to change the selected employee.
Reminders: select a reminder from the drop-down menu. Default options include Notification, Email, and SMS Text Message, each with a specific time period before the event (hours, days, etc). The chosen reminder chosen alerts the meeting participants of the meeting, via the selected option at the specified time. Multiple reminders can be selected in this field.
Send meeting to attendees
Once changes have been entered on the New Event pop-up window, and the meeting details are correct, the meeting can be sent to the attendees, via email or text message, from the expanded event form (what is seen when the More Options button is clicked on in the New Event pop-up window).
To send the meeting via email, click the Email button next to the Attendees field on the expanded meeting form.
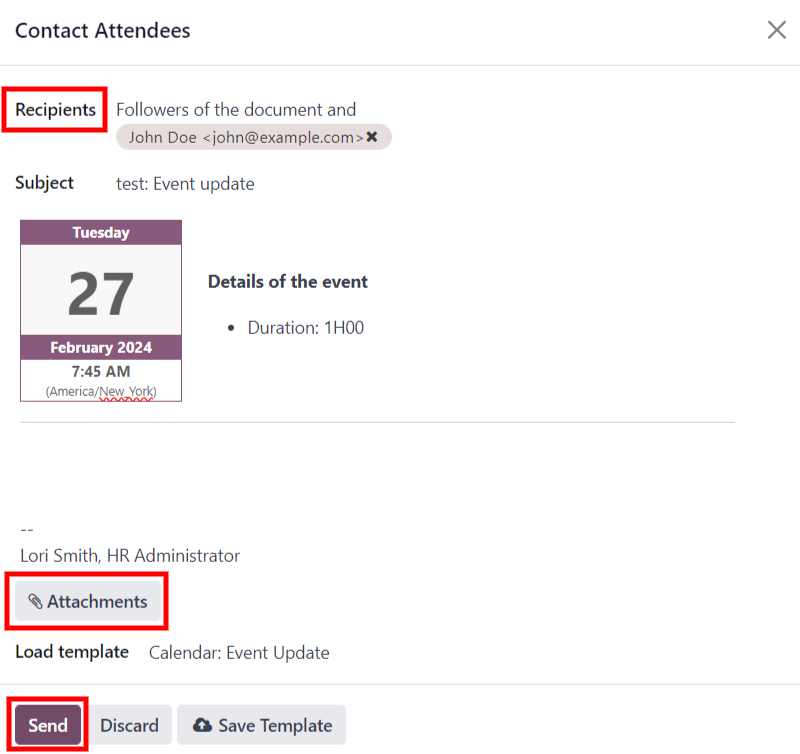
A Contact Attendees email configurator pop-up window appears. A pre-formatted email, using the default Calendar: Event Update email template, populates the email body field.
The followers of the job application, as well as the user who created the meeting, are added as Recipients by default. If needed, add the applicant’s email address to the list to send the email to the applicant, as well. Make any other desired changes to the email. If an attachment is needed, click the Attachments button, navigate to the file, then click Open. Once the email is ready to be sent, click Send.
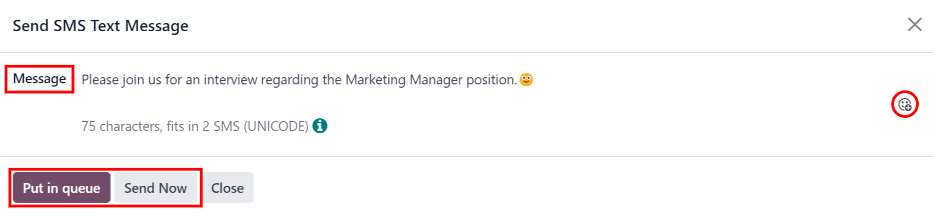
To send the meeting via text message, click the SMS button next to the Attendees field on the expanded meeting form. A Send SMS Text Message pop-up window appears.
At the top, a blue banner appears if any attendees do not have valid mobile numbers, and lists how many records are invalid. If a contact does not have a valid mobile number listed, click Close, and edit the attendee’s record, then redo these steps.
When no warning message appears, type in the message to be sent to the attendees in the Message field. To add any emojis to the message, click the (smile add) icon on the right-side of the pop-up window.
The number of characters, and amount of text messages required to send the message (according to GSM7 criteria) appears beneath the Message field. Click Put In Queue to have the text sent later, after any other messages are scheduled, or click Send Now to send the message immediately.
Note
Sending text messages is not a default capability with Odoo. To send text messages, credits are required, which need to be purchased. For more information on IAP credits and plans, refer to the In-app purchases (IAP) documentation.
Applicant scheduled interviews
By default, the recruitment interview stages are not set up for applicants to schedule their own interviews.
However, if the First Interview or Second Interview stages are modified to send the Recruitment: Schedule Interview email template when an applicant reaches that stage, the applicant receives a link to the recruitment team’s calendar, and can schedule the interview on their own. The recruitment team’s availability is reflected in the calendar.
In order for applicants to be able to schedule their own interviews, a stage must first be modified in the Recruitment app.
Modify stage
To modify either the First Interview or Second Interview stage, first navigate to the main app dashboard. Next, click on the desired job card to navigate to the Applications page for that job position.
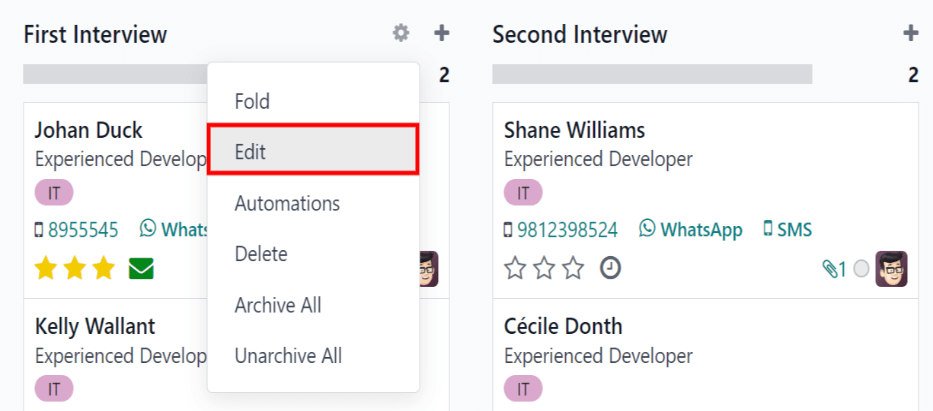
Hover over the name of the stage, and a (gear) icon appears in the upper-right hand side of the stage name. Click the (gear) icon, and a drop-down menu appears. Then, click on the Edit option, and an Edit: (Stage) form appears.
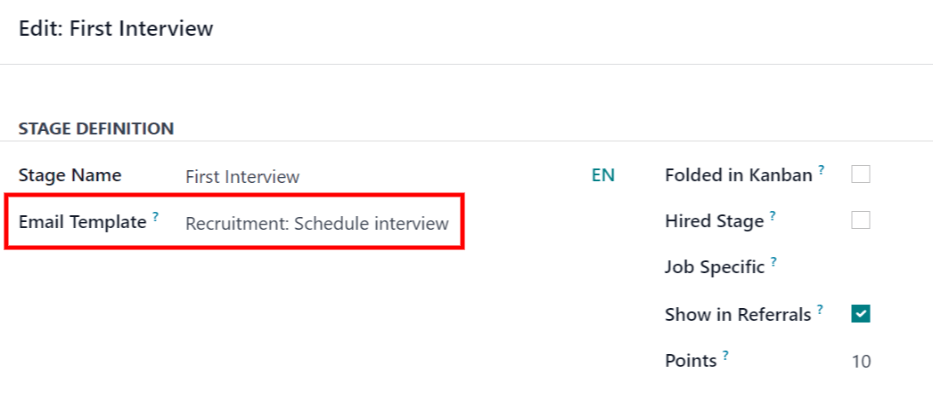
The Email Template field is blank, by default. Using the drop-down menu, select Recruitment: Schedule interview for the Email Template field, then click Save & Close when done.
Send email
After either the First Interview or Second Interview stages are modified to send the Recruitment: Schedule interview email to the applicant upon moving their applicant card to one of those stages, the following email is received by the applicant:
Subject: Can we plan an interview together for your (Job Position) application?
Congratulations!
Your application is really interesting and we'd like to plan an interview with you.
Can you please use the button below to schedule it with one of our recruiters?
Plan my interview
Schedule interview
When the applicant received the email, they click the Plan my interview button at the bottom of the email. This navigates the applicant to a private online scheduling page, which is only accessible through the emailed link.
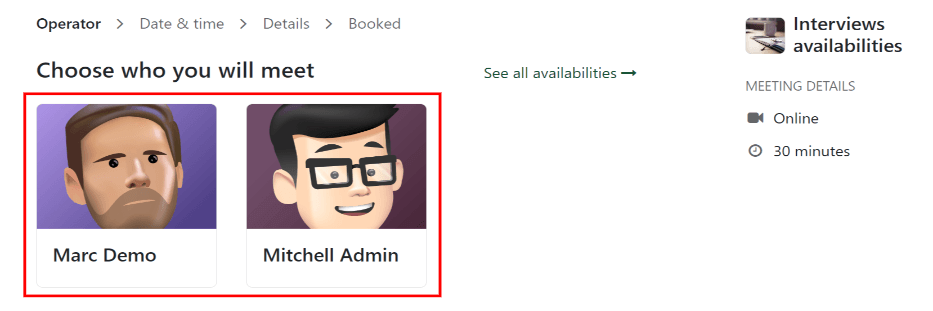
This page displays the MEETING DETAILS on the right side of the screen. This includes the format and length of the meeting. In this example. the interview is virtual ( Online) and the duration is a half hour ( 30 minutes).
First, if there is an option of who to meet with, the user selects who they are scheduling their meeting with, by clicking on their icon and name. If only one person is available to interview the applicant, this step is not available. If the applicant does not wish to chose an interviewer, they can just click See all availabilities .
Note
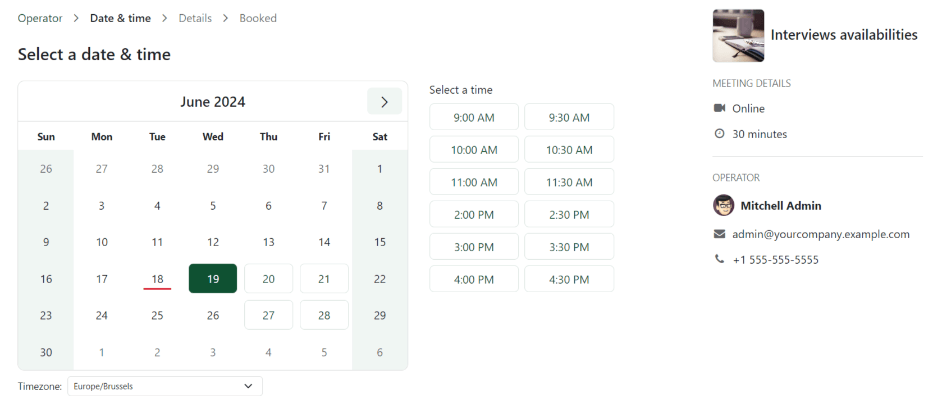
If the applicant selects an interviewer, the applicant is shown a Select a date & time page, and only sees the dates and times that specific person is available. In addition, that interviewer’s information (name, email, and phone number) appears on the right-side of the screen, under the heading OPERATOR, located beneath the MEETING DETAILS.
If the applicant clicks See all availabilities instead, or if there are no interviewer options available, the user is navigated to the same Select a date & time page, but there is no OPERATOR section visible.
Then the applicant clicks on an available day on the calendar, signified by a square around the date. Once a day is selected, they click on one of the available times to select that date and time.
Tip
Be sure to check the Timezone field, beneath the calendar, to ensure it is set to the correct time zone. Changing the time zone may alter the available times presented.
Once the date and time are selected, the applicant is navigated to an Add more details about you page. This page asks the applicant to enter their Full name, Email, and Phone number. The contact information entered on this form is how the applicant is contacted to remind them about the scheduled interview.
When everything is entered on the Add more details about you page, the applicant clicks the Confirm Appointment button, and the interview is scheduled.
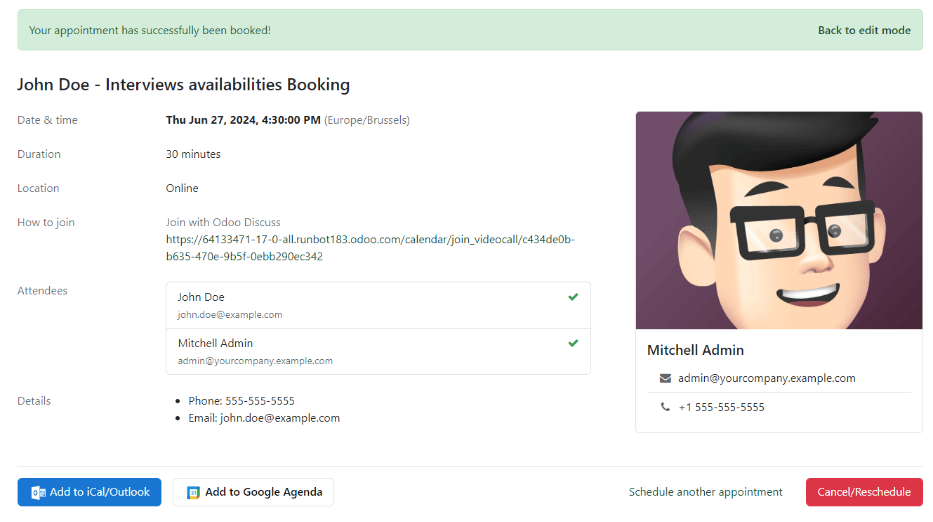
After confirming the interview, the applicant is taken to a confirmation page, where all the details of the interview are displayed. The option to add the meeting to the applicant’s personal calendars is available, through the Add to iCal/Outlook and Add to Google Agenda buttons, beneath the interview details.
The applicant is also able to cancel or reschedule the interview, if necessary, with the Cancel/Reschedule button.